Start
Active lighting Passive lighting
Comparing active & passive visibility in darkness
What about daytime visibility?
Visibility doesn't guarantee safety
|
Active lighting equipment
Redundancy
You probably wouldn't notice immediately if your only taillight stopped working while you were riding, and you could be in immediate danger if your only headlight failed while you were riding. So consider using more than one headlight and taillight, so you're equipped to handle a light failing or running out of power.
Taillights: flashing or steady?
People often debate whether it's better to run your taillight in flashing mode or steady mode. I've seen many people claim that it's more difficult to determine the range of a flashing light. Others point out that the flashing light is distinctive and will attract the eye of the observer much better, particularly amid other steady lights such as car taillights. My viewpoint is that all bicycle taillights are so small that it will be difficult to determine how far away they are, regardless of whether they are running steady or flashing. Compare the size of a bike taillight to the size of a Honda Accord taillight, and think about it. At any meaningful distance, your taillight is simply an arbitrary point-source of light. It might as well be a flashing one, if your laws permit flashing lights.
Think about how much easier it is to determine the range of a car that has two working headlights or taillights, instead of just one, because you can judge its distance by how far apart the lights appear to be. If you would like to help motorists determine how far away you are, you might do better by having several lights which are physically separated like the headlights or taillights of a car, so that they diverge as the observer gets closer. A helmet-mounted taillight combined with a bike-mounted taillight would be vertically separated by about a meter, for example.
Also remember the concept of divergence when installing passive visibility equipment; for example, if you use panniers, you can attach reflectors to each one so that they diverge as the observer gets closer. In general, the larger your visual "signature," the easier it should be for the observer to determine how far away you are.
|
LED taillights
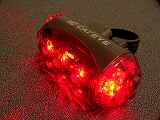
Planet Bike "Blinky 5" This US$15 blinkie does double duty. It's both a light and a genuine passive reflector in one (most blinkies don't function as a passive reflector). It includes a rack mount, a seatpost mount, a seatstay mount, and can also clip onto bags directly. For a "budget" model, it is also quite powerful, far more powerful than Cateye's competing TL-LD500.
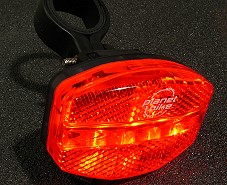  combining a good blinkie and a real reflector, the Blinky 5 is a good pick by itself, and a good secondary blinkie if you're going to use more than one
Bar-end blinkies can be a good secondary taillight. The horizontal spread also gives you a larger visual profile. Since they will shine on your legs, they can add a little front & side visibility too. Trek's versions (both road and flat-bar) use one AAA cell for power, instead of expensive button batteries, so they're my top pick in this category. Note: these lights do consume batteries quickly, so use rechargeable NiMH AAA cells and recharge them every week or less.
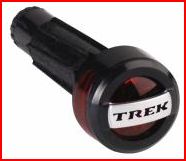 Trek's AAA-powered bar-end blinkies.
Note for the road-bike version: if the ends of your road-bike handlebars are not level, then the lights will be aimed at the ground, diminishing their effectiveness.
Planet Bike self-illuminating reflective straps can be a nice secondary light if you don't mind the nerdy aspect. They can run steady or rapid-flash modes.
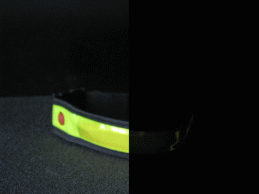 a red LED illuminates a "light tube" behind the yellow retro-reflective material
If this strap is worn on the ankle, it will be moving in a cyclic motion. The light runs on a single CR2032 watch battery like most cycling computers use, so it is not very expensive to maintain. The yellow part of the strap is retroreflective too. Your local bike shop should be able to get these for you.
Cateye TL-LD1100 taillight This LED taillight is about US$30-40. Besides its six rearward-facing LEDs, it also has two aimed to the left and two aimed to the right, for side visibility. It runs on two AA batteries, and it can be bolted onto reflector brackets. It comes with a mount to attach it to the seatpost or frame.
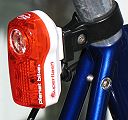
Planet Bike "Blinky SuperFlash" This US$20 model is slim and compact, but it's one of the most powerful blinkies available. Like the Blinky 5, this light can be mounted on a seatpost or a seatstay with the included mounting clamps. Planet Bike's optional rear-rack bracket will allow this light to be mounted to a rear rack, but be aware that it may get water inside if it is exposed to direct tire spray in wet weather without fender protection.
If you can afford it, the DiNotte 140R taillight is excellent. If you want to be seen from long range on a highway in the daytime, or to be seen under the worst possible city conditions through a rain-covered windshield, this investment might be worth it to you. These are available in two versions, one which uses rechargeable NiMH AA cells, and another which uses rechargeable Lithium-Ion batteries. If you want to order the light with the LiIon option, but don't want two battery packs, call DiNotte and they should let you buy it with just a single LiIon battery.
DiNotte has also introduced the 400-series taillight, with twice the power of the 140-series models, and people who routinely ride in extremely dangerous conditions (such as dense fog on fast roads) might want to consider that option.
Aim your taillights carefully, so the "hot spot" of the beam is aimed directly into overtaking traffic, not aimed up, down or sideways. These lights are highly directional, so do not waste their effectiveness with poor aim. Be aware that clipping lights onto something soft may leave them sagging and not aimed well.
|
|
Headlights
In the past, I listed cycling-specific headlights here. Today, your options also include compact, powerful flashlights mounted on your handlebar or helmet using a bracket, a mounting block, or O-rings, so I'll mention them first.
LED technology takes over
Light-Emitting Diode (LED) technology is taking over the market from halogen and High-Intensity Discharge (HID) lights. This is a good thing:
- LEDs are extremely durable. They rarely fail, even if you drop them or crash.
- LEDs are very efficient, and their efficiency is still improving further. This means you can get good light output and runtime from relatively small battery packs.
- LEDs can be run far below their peak output, for extended runtimes.
- LEDs do not have a limited number of start-up/shutdown cycles (unlike HID), and they start instantly, so they can run in flashing modes.
When you shop for an LED light, realize that different LED emitters produce different amounts of light per watt, so you cannot judge them accurately by comparing their wattage ratings. For example, at 1 watt, some LED emitters give 30 lumens, and others give 80 lumens (Lumens are a scientific unit of light output). Look at the lumens, not the wattage!
Also realize that the beam pattern is very important. A road rider who is travelling at high speed in a fairly straight line will probably prefer a focused beam with a lot of "throw" (long-range punch). An off-road rider who rides singletrack trails and technical terrain will probably prefer more "spill" (light flooding across a wide area). Look at the beam patterns, not just the lumens!
High-Powered LED Flashlights
See this thread at CandlePowerForums.com for many flashlights which use the latest, most efficient emitters. Some of them are below US$20. Be sure to look at the REVIEW links to see what the beam patterns look like. If you'd been considering a low-end rechargeable halogen light for commuting, look at some of the inexpensive flashlights; you can probably get better lights for less money this way, even with the cost of batteries and a charger.
Fenix L2D Premium Q5 I use this US$62 light, usually on Turbo mode (180 lumens). It is a quality light with very little weight, a very efficient and powerful emitter, acceptable runtime, a good all-purpose beam pattern with a mixture of throw and spill, and regulated output so it doesn't run dim until it's nearly depleted. If you choose this light, use high-quality rechargeable NiMH AA cells with 2500-2700mAH capacity (Sanyo 2700mAH is excellent). I attached this light to my helmet using O-rings to serve as a secondary light for riding off-road trails. To attach it to your handlebar, use a TwoFish CycleBlock. If you pick this light, or other lights that use AA or AAA cells, the LaCrosse BC900 is a good charger to consider.
Tip: If you use a flashlight as a bike light, and the batteries rattle in the light, then cut a piece of paper, roll it into a tube, and slip it into the battery tube. Then slide the batteries into the paper tube.
Bicycle-specific rechargeable LED lights Read Gearreview.com's 2008 LED bike light comparison to see in-depth information about some very good 2008 headlights.
Bicycle-specific non-rechargeable LED lights After seeing the impressive LED flashlights that are available today, it is difficult to be enthusiastic about the usual plastic bike-specific LED headlights anymore, such as Cateye, Planet Bike and others. Cateye and other bike-light makers need to stop resting on their laurels and produce some lights that can seriously compete with Fenix and other flashlight makers.
|
|
Secondary front light
Lights can fail or run out of power. Consider having a second front light, as well as a second rear light. Even a small secondary light will help you be seen, besides keeping you street-legal. If you actually need to see the road by the light of your second light (for example, if your regular route involves a fast descent, where an unexpected light-system failure would put you in immediate danger), then you may want to have more than one high-powered light system.
|
|
Side lighting
Most people think about front and rear lights, but what about side lights? I've heard credible reports that most collisions are from the front or sides. What can you do to make your bicycle and yourself visible from the side?
One answer is to add reflective tape to your wheels and your bike, and to use high-visibility clothing and/or a high-visibility neon-lime vest (particularly for daytime visibility). Those techniques are worthwhile, but they are still just passive visibility tactics, and there are many situations where they don't work well (especially in low light or darkness), as you will see if you continue through this guide. Here are some options for active lighting which is visible to people who are approaching you from the side:
Self-illuminating flashing legbands, such as the Planet Bike or Nathan models. I have also seen generic legbands with blinking LEDs in them.
Planet Bike also has the amber BRT-3F blinkie available. Amber is a direction-neutral color which does not signify front or rear, unlike red or white lights, so these can be clipped to the sides of your front panniers or handlebar bag, or to the sides of a backpack, or even attached to the sides of your bike's head tube, fork blades, or the ends of your handlebars with a little creativity. Another interesting amber light to consider: eGear Guardian, a small clip-on light that runs on two CR2032 batteries.
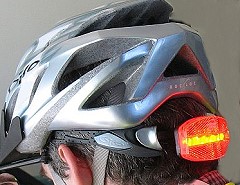
A helmet light can be steered anywhere you can look. However, this can be a double-edged sword, since flashing a light in peoples' eyes (intentionally or not) could provoke a reaction from some people. Also, this requires that you are already aware of danger in order to try to prevent a collision.
|
Next: Passive lighting (relying on the other guy)
|
 ©
©